Showing posts with label decorating. Show all posts

May 22, 2015

Place Mat Outdoor Throw Pillow


When we moved into this house, we were so excited that there was a little front porch. We have lived in our house almost four years.  First off let me just say that I can't believe we have lived here that long. Technically we have lived here long enough now that this is our second set of cushions/pillows for our white outdoor chairs (from Target).

Previously our chair cushions were gray and the pillows were coral and white. I bought them when those colors were super popular. After some wear and tear, I needed something new. When I was looking at what to get now, I decided to look at not just what was popular color wise, but to also look at what I knew I loved and would always love. That meant blue people.

I am sure you are shocked. Blue and white. I am nothing if not consistent.

I went back and forth on what to do for the throw pillows. Then I remembered a set of gray place mats I had laying around. I had originally bought them for another project, but I changed my mind. I have had them for like two years just waiting to fulfill their design purpose.

That is how the Place Mat Outdoor Throw Pillow was born. Two place mats plus some stuffing equals two perfect lumbar throw pillows for our porch chairs.


I have made throw pillows from place mats before. They are one of the easiest throw pillows you will ever make.

You just need--

a place mat (one that is layered like a quilt, basically not just one piece of fabric)
stuffing
needle/thread


On one of the short sides of the place mat, in the middle, pick the seam and create a 4-5 inch opening.


Stuff, stuff, stuff away. Make sure to really cram it full and get the stuffing into all the corners.


Hand stitch up the opening.

BAM! Done.


The throw pillows were not the only new addition this year. I got this bird cage for 60% off at JoAnn's. I then filled it with an IKEA plant and container that we already had. The wind blows something fierce around here, so something heavy has to anchor it down.


I really, really love IKEA's faux plants. If you were to walk around my house, you would find a lot of them.


Now we have the perfect place to sit and enjoy the delights of Summer. I always like coming home, but driving up to my house and seeing this little porch set up really brings a smile to my face.


Follow along with Just Another Day in Paradise
Instagram        Facebook        Pinterest

Mar 16, 2015

Project Master Bedroom: Embroidered Throw Pillow


A small group of people start and finish a room makeover in a small window of time. However, most of us finish a room project in bits and pieces. I won't lie, the impatient, HGTV show lovin' self would like to be able to get my rooms done in a week with all the details just so. Who wouldn't? But that is not a reality for most of us.

Bits and pieces. Save up. Buy a little at a time. That is how most of us make over a room. So no more beating ourselves up or hiding our room projects away because they aren't 100% done. We are all in the same boat. So let us cheer each other on in our various stages of projectness (totally a word).


So here is my Project Master Bedroom update.

As I have said before, in the almost 14 years that we have been married this is the very first time we are getting a lovely master bedroom. We have done all the other bedrooms and have even done a guest bedroom but have yet to even paint our master bedroom.

I have a vision in my head of how I want this room to come together. Now thanks to new white doors and trim, a few coats of paint, and a hard-working husband who put up my board and batten focal wall I am that much closer to having a super lovely and cozy room.

With the big stuff done, it is just time to add here and there. Some of my wishes are things I have to save up for. A reading chair and white bamboo shades are two items on my wish list. So while I save up for a few big wishes I will tackle the bedding.

The main bedding we have had on the bed for over a year. I added the Flour Sack Euro Sham a few months ago. Recently I added just one more pop of blue, because you all know how I love blue, with this throw pillow.


I bought this textile from IKEA and I have been holding on to. I finally deemed it time to make it into a pillow. Instead of simply cutting out the fabric into two pieces and installing a zipper, I decided I wanted to add a little embroidery detail. I cut three separate pieces for the front. I sewed the three pieces together and then hand stitched with embroidery floss on either side of each seam before I sewed together the whole pillow.

Isn't it charming?

I recently had a friend come see my master bedroom progress. When she saw my bed, she said "I bet you love to make your bed every morning." I really do. I really, really do.


Thanks for hanging out with me for my Project Master Bedroom update. There are a few things still left to be done, but no promises on how soon I will get it done. The anticipation will be worth it right? Haha.

Follow along with Just Another Day in Paradise
Instagram        Facebook        Pinterest

Feb 18, 2015

His and Hers Nightstands


The Hubs and I have been married for 13 1/2 years. In all that glorious wedded bliss we have never had a retreat just for us. Our master bedroom was always the last on the list. We decorated main rooms, we decorated the boys' rooms several times. In two apartments, our first house, and over three years in this house our room has been a hodgepodge of randomness.

Well friends, we are all grown up and are working on our very own wedded bliss oasis FINALLY.

I have been sharing little bits of our #projectmasterbedroom on Instagram (@larissa_anotherday). We have changed the color and brightened up the trim and doors to a nice white. Our favorite part is our new board and batten wall with shelf. Of course I will show that in more depth soon; I have to do a couple of projects to wrap up before I can show you that.

The next favorite part of our Project Master Bedroom is that we now both have nightstands. Each nightstand is different yet coordinates with each other and the general style of the room. Both old and new elements. These nightstands happily flank either side of our bed. His and Hers Nightstands, if you will.

This is a post all about laughing in the face of the idea that nightstand have to be identical to each other. Okay so this post is really about two lovely nightstands that just happen to be on the opposite sides of our beds, hence the His and Hers Nightstands.

Let's start with the His Nightstand.


This is an old nightstand. We have had this since we first got married. This is a Target nightstand from just before Target got really stylish. They were a little stylish, just not as dreamy and irresistible as they are now. I decided it was finally time to spruce it up.

I painted over the laminate honey color with a lovely white chalk paint. Then The Hubs and I attached caster wheels to the bottom to give it not only height, but also a decorative detail.

This white little clock was under $3 at The Mart. I paired them with these great vintage readers, in of course my favorite color blue.


A simple white frame holds a candid wedding shot of The Hubs and I goofing off.


One of my favorite details of the His nightstand is this vintage gym locker basket. LOVE. 


This red lamp from IKEA is a favorite and gives a pop of color. Remind me to thank The Hubs for insisting it stay red (we were originally going to paint it).
 

That was the His nightstand. On to the Hers nightstand.


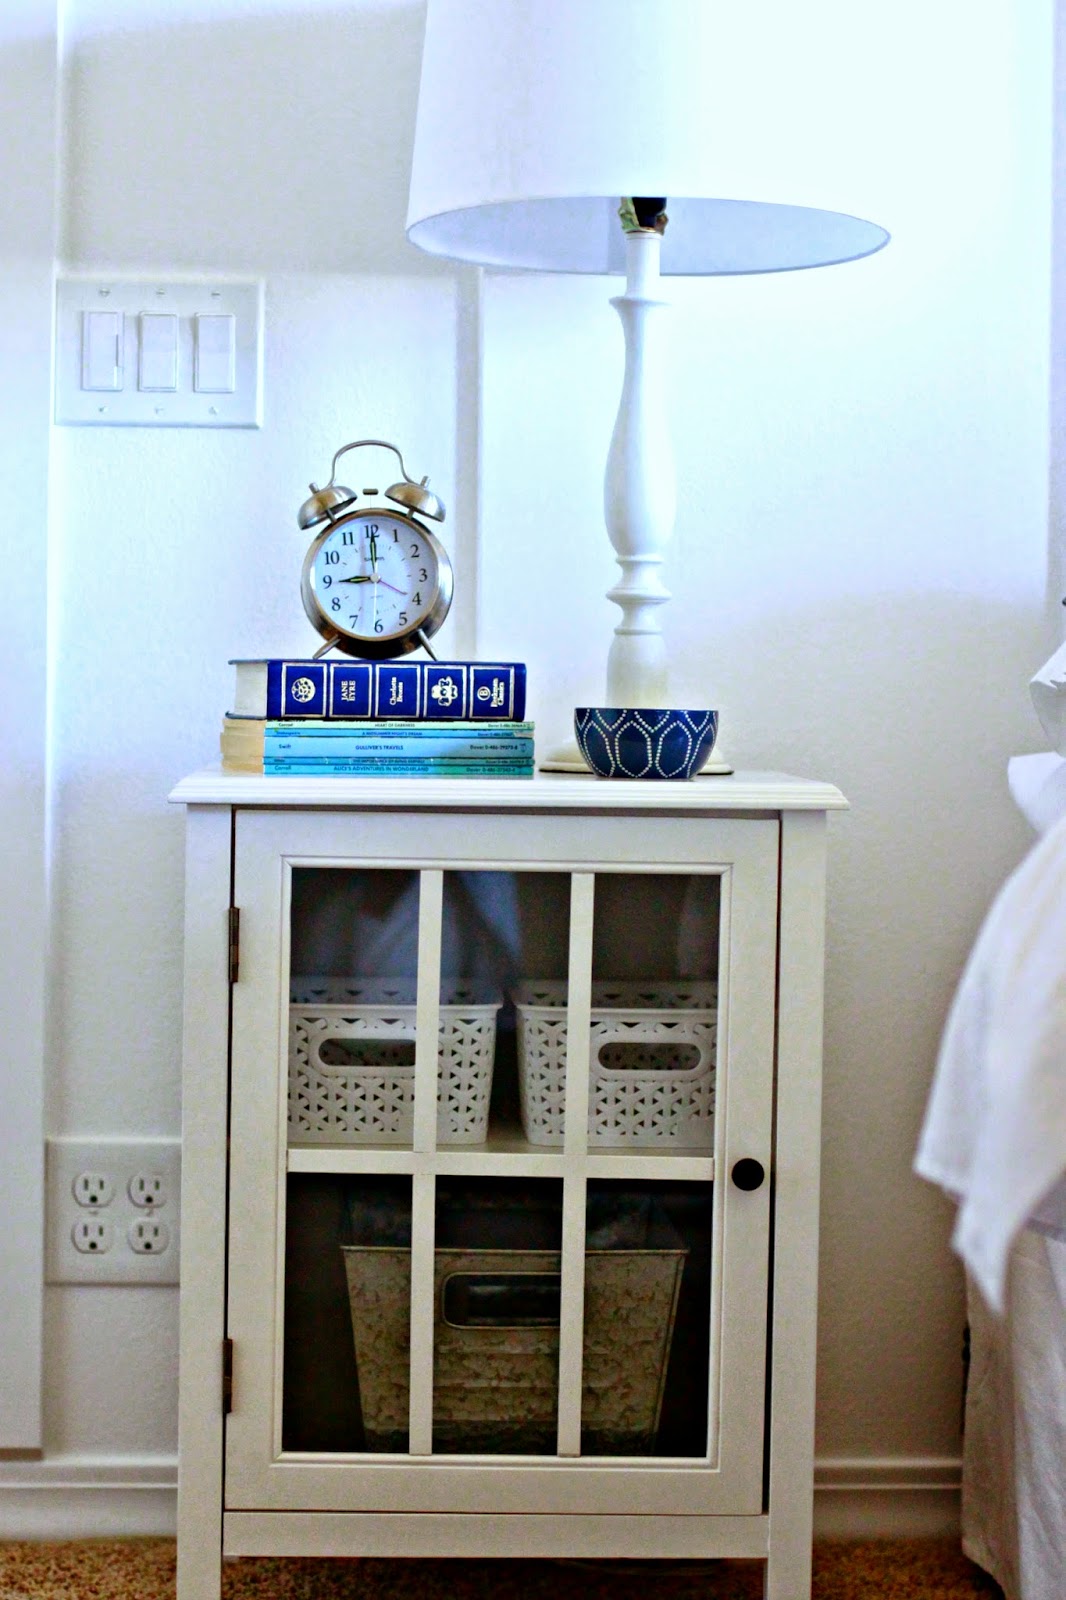
This is a new nightstand, also from Target but circa really stylish and irresistible (obviously). I love the glass door that allow me to show off some cute storage. The white plastic baskets are from Target. The metal bin is from The Mart.
 

Since I am the lover of blue and white, I accessorized my nightstand with a little more of those colors. I found this glorious bowl in the kitchen section of Target. Little design gems can be found anywhere, so think outside the box.


Instead of a colored lamp, I opted for this very traditional white lamp. We have had the lamp for years and year. I simply put a new shade on top.


After thrifting from around our house, I used this clock and some amazing blue books. These books have been sitting on our bookshelves since before Oldest was even born. Now they have found a new home on my nightstand.


There in all its glory is the Hers nightstand.


With these His and Hers Nightstands we are that much closer to completing Project Master Bedroom. I smile every time I see them. Hopefully I can show you the rest of the room soon.

Follow along with Just Another Day in Paradise
Instagram        Facebook        Pinterest

Feb 12, 2014

Pillowcase Heart Envelope Throwpillow


What? Is it only a couple days from Valentine's Day? Seriously?

Yeah, okay, so I know this. This was one of those posts that, although it has been done and even photographed for ages--like AGES, I tell you--I just didn't whip out a post.

So today, I am sharing the how-to on these sweet, very simple Pillowcase Throw Pillows.

The good news is that hearts (and bows) are not just for Valentine's Day. The other good news, yep there is more, is that this simple throw pillow how-to can be altered and changed for other seasons or for general decoration.

The possibilities for this Pillowcase Throw Pillow how-to is endless.

Between the heart stencil on the front and these adorable felt bows on the back, you are sure to make your sofa really happy with the addition of these lovely pillows.


These pillows are practically sew free. They are so very easy to whip up.


What you need:

standard pillow cases
freezer paper
fabric paint
felt, cut into 4"x20" and 2"x6" rectangles
velcro, cut into 2- 4" strips
hot glue
thread
18x18 pillow form


Take out the pillow cases and iron all the lines out of them. Fold the top over so the flap is 10". Iron the fold in place.

Trace a heart, or whatever shape you would like, on to the non-shiny side of sheets of freezer paper. Cut out the shape with an exacto knife.


Iron the freezer paper onto the non-flap side of the pillowcase. Once the freezer paper is securely ironed on, place a piece of cardboard in the pillow case so the paint does not bleed through. Next, apply craft paint in a thin coat with a craft brush. Apply more coats as needed. Make sure not to get too heavy handed around the edges.

Allow to dry for several hours, or cheat by drying the paint with a blow dryer. Remove the freezer paper.


Sew the velcro in place at the top middle of the inside of the pillow case, so that it has a closure.


Once the velcro is in place, it is time to make the bow.


Fold the larger rectangle so the ends overlap. The bow should measure about 9" wide once folded. Sew up the middle. Fold the smaller piece in half and just sew up the outside edge.


Turn the middle piece out so the seam is on the inside.


Fold the large piece a little to put it through the turned out smaller piece.

Arrange the bow and mold into bow shape. Make sure the seam for the smaller piece is in the back.


Attach the bow to the flap side, on the front, bottom, middle of the flap itself. Basically just over the stitches from the velcro you applied to the inside.


Once the glue dries, insert the pillow form. The weight of the felt bow will help the envelope flap stay down so there is no additional closure needed.


You can arrange the pillow heart out, bow out, or one of each.


My favorite part of these pillows, just after the ease of the project of course, is that BOW. Eek. Swoon. I love that bow.

Now I am trying decide in a house full of boys where else I am allowed to put bows!

Hope you find this tutorial useful for more than just Valentine's decor or that you pin it for next Valentine's Day. Gotta love Pinterest.

Follow along with Just Another Day in Paradise

Instagram        Facebook        Pinterest        Twitter


Oct 8, 2012

Halloween Ghoulie Printables


Happy Halloween everyone.

We are now a good week into October. Only three weeks left until Halloween. AHHHH! Costumes not even close to being done...

Don't think about, just don't think about it.

Currently, our house doesn't even look too spooky or festive or scary or trick-or-treaty. This last week I have had the constant internal conversation with myself,

"To decorate, or not to decorate??"

I don't always decorate for Halloween. GASP.

I know, are you disappointed in me?

I mean I do proclaim to be a DIY, crafty, holiday-lovin' blogger. SO it is quite shocking that I don't decorate for every single ever-lovin' holiday. Shocking indeed.

I have had the intention of decorating this year. I do have a couple of ideas in my head about some simple decorations. However, as of now they are still just ideas knocking around in my head with all the other crazy going on in there.

I may even pull off a mantle decoration by October 30th...we shall see, we shall see.

I have been playing around with an idea for a big graphic print for the mantle. Recently, I was messing around in PicMonkey, taking advantage of all of their awesome Halloween photo editing options.

While I am still working on the print for my mantle,  I veered off what I was doing and started creating these fun, traditional, and ghoulie graphics instead.

They would be really great printed off and framed. They would also be great printed off as posters and hung.

I love the simple fun silhouettes of the traditional Halloween Ghouls. I added their "sound" of choice at the bottom to complete the print. The quintessential green, purple, and orange help add to the Halloween mood.


I also made the individual graphics available in collage style. 


In order to add these to your Halloween decorations, all you have to do is right click on the image and save as a photo on your computer. After you have saved them to your computer simply print them off at your favorite photo place.

Costco and Sam's Club has great prices on printing off photos in poster size.

Happy Halloween Friends!

Apr 21, 2012

A Pinteresting Saturday: Engineer Print Poster


Were any of you wondering if my A Pinteresting Saturday segment had died??

Well...

It's ALIIIIIIIVE!

I have had this project done for well...forEVA. Seriously. I had it the poster done way before Bean was born. Alas, I have not had hardly any desire to get on this thing they call the computer. Gasp. Shocking. I know, right? So finally months later this project from my Pin Boards is making it's debut on the blog.

The original came from Sugar Bee Crafts--


Like her I had seen the tutorial on I Am Momma awhile ago...WAY before the glorious Pinterest. When I came across her refresher I pinned it immediately.

I just KNEW I had to do this for Oldest's room. I had the perfect idea for his Star Wars room.

We just happened to have a Darth Vader costume laying around. Bonus!

Dress up Oldest and start shooting photos.


Turn my favorite into black and white (the photos have to be b&w to print of an engineer print).


Then go over to Staples or a similar office supply store and ask them to print off an engineer print. They come in multiple sizes. I picked the one that fit closest to the poster frame I had purchased from The Mart.

Because I was putting mine in a frame I was able to skip her adhesive step...honestly probably saving myself quite a bit of hassle.

Once the poster was all framed I found it a home on Oldest's bedroom wall.  Yes, I know there are empty frames and THIS is totally missing still from the wall. I am getting there people...eventually.


The whole process was E.A.S.Y. Printing off this poster was also cheap, I mean cheapity, cheap, cheap. I am super thrilled with how it turned out and would recommend this project to anyone.

Oldest loves the personalized poster sized picture of himself.


Any one else singing, "duh, duh, duh, dun daduh, dun daduh..."?

LinkWithin

Related Posts Plugin for WordPress, Blogger...